How to Rig Live Bait for Trolling
There’s nothing quite like the thrill of a rod bending over, knowing that a feisty Maine game fish has just hit your meticulously rigged live bait. But let's be honest, getting that live bait to present just right while trolling can feel like a dark art, full of snags, lost bait, and frustratingly empty strikes. This guide is here to unravel the mysteries of rigging live bait for trolling in Maine, offering practical advice and step-by-step techniques to help you consistently fool those elusive landlocked salmon, togue, and bass.
Understanding Your Live Bait Choices for Maine Waters
When it comes to live bait, selection and care are paramount. A lively, healthy baitfish is infinitely more appealing to a predator than a sluggish, half-dead one. In Maine, we’re blessed with several excellent options that make fantastic trolling bait.
Popular Baitfish Species for Trolling
The key to successful live bait trolling often starts with understanding what the local game fish are naturally preying on. In many of Maine’s cold, deep lakes, smelt are king. Their slender profile and oily flesh are irresistible.
- Smelt: These small, silvery fish are arguably the top choice for targeting landlocked salmon and lake trout (togue) in Maine. They are naturally occurring forage in many of our best fishing lakes, making them the perfect "match the hatch" bait. Smelt tend to stay active on the hook, providing that natural, irresistible wiggle. The challenge with smelt is keeping them alive, as they prefer colder, highly oxygenated water. If you can keep them lively, they are golden.
- Shiners: Golden shiners, emerald shiners, and fallfish minnows are also excellent choices, especially for bass, but will readily be taken by salmon and togue too. Shiners are generally hardier than smelt and can tolerate a wider range of water temperatures, making them a bit easier to keep alive for a full day of trolling. Their flash and vigorous swimming action are great for attracting attention.
- Suckers: For larger game fish, particularly big togue or pike in waters where they are present, smaller suckers (like common suckers or white suckers) can be a fantastic option. They are incredibly tough and can withstand a lot of abuse, staying alive for extended periods even when trolled at moderate speeds. Their broader profile can entice bigger bites, but make sure they are legal in your specific fishing area, as bait restrictions vary.
Always check the current Maine Fishing Regulations Explained for any specific bait restrictions for the waterbody you plan to fish. Some lakes have "no live bait fish" rules to prevent the spread of invasive species, so it’s always better to be safe than sorry.
Sourcing and Keeping Bait Alive
The freshest bait is always the best bait. If you can catch your own, that's ideal, as you know exactly where they came from and how they've been handled. Otherwise, purchasing from a reputable bait shop is your next best bet.
When buying bait, look for vigorous swimmers with no signs of disease or injury. Ask the shop what they recommend for the fish you're targeting and the body of water you'll be on. Once you have them, the challenge is keeping them alive and lively until they hit the water.
- Transportation: A good quality insulated bait bucket with an aerator is non-negotiable. You can find excellent battery-powered aerators on Amazon that will keep your bait well-oxygenated during transport and throughout your fishing day. For smelt, keeping the water cool is just as important as oxygen. A cooler with ice packs (kept separate from the bait water, or in a sealed bag to cool the water without diluting it) can make a huge difference, especially on warmer days. Avoid overcrowding your bait container; more space means more oxygen per fish.
- On the Water Care: Continue using your aerator. Change out a portion of the water periodically with fresh, cool water from the lake or river you are fishing, assuming it's clean and safe. This helps remove waste products that can foul the water. Keep the bait bucket in a shaded, cool spot on your boat. The livelier your bait, the more enticing it will be, so treat them like gold!
Essential Gear for Rigging Live Bait for Trolling
Having the right tackle is crucial. It’s not just about getting the bait in the water; it’s about presenting it naturally and having the power to land a hard-fighting fish once it strikes.
Rods, Reels, and Line for Trolling
Your trolling setup needs to be robust enough to handle the stresses of trolling heavy weights or large planer boards, yet sensitive enough to detect subtle hits from finicky fish.
- Rods: Look for medium to medium-heavy action rods, typically 7 to 9 feet in length, with a good parabolic bend. This softer action acts as a shock absorber, preventing hooks from tearing out of a fish's mouth and minimizing lost bait when trolling. Fiberglass rods are often favored for their durability and forgiving action. For specific target species like landlocked salmon, a dedicated "downrigger rod" with a softer tip can be a game-changer when combined with a downrigger, as explained in our guide on How to Use a Downrigger for Lake Trout.
- Reels: Level-wind baitcasting reels are the standard for trolling. They offer excellent line capacity, smooth drags, and the ability to handle heavier lines. Make sure your reel has a reliable drag system that can be precisely adjusted. Line counters are a fantastic feature, allowing you to accurately replicate successful trolling depths. For beginners, a good quality, reliable reel doesn't have to break the bank, and many excellent options can be found on Amazon.
- Line: For mainline, 10-20 lb monofilament or braided line is typical. Monofilament offers some stretch, which can be forgiving. Braided line has no stretch, providing excellent sensitivity, but it requires a leader to absorb shock. No matter your choice, ensure it's fresh and free of nicks. For leaders, fluorocarbon is highly recommended. It’s virtually invisible underwater and incredibly abrasion-resistant. A 6-12 lb fluorocarbon leader, depending on the target species and water clarity, is generally appropriate. You'll want to review your specific needs when researching options like those available on Amazon.
Terminal Tackle: Hooks, Leaders, Swivels, and Weights
This is where the magic happens – connecting your bait to your line in a way that’s both effective and natural.
- Hooks: The size and style of your hook depend heavily on the size of your bait and the mouth size of your target fish. For smelt and shiners, small, sharp single hooks (size 4 to 1/0) are generally preferred to avoid impeding the bait’s action. Treble hooks (size 8 to 4) can be used, particularly with quick-strike rigs, but they can be more damaging to the bait and make catch-and-release more difficult. Circle hooks are also an option, especially if you want to ensure a hook-up in the corner of the fish's mouth, minimizing harm.
- Leaders: As mentioned, fluorocarbon leaders are key. They connect your main line to your hook or rig. A good knot, like a Palomar knot or improved clinch knot, is essential for strength. The length of your leader can vary, but typically 2-4 feet is a good starting point, allowing for natural bait movement.
- Swivels: High-quality barrel swivels or ball bearing swivels are essential to prevent line twist, especially when trolling spinning baits or if your live bait starts to spin. A swivel also creates a clean connection point between your mainline and your leader. Snap swivels can be handy for quickly changing out lures or rigs, but for live bait, a simple barrel swivel is often sufficient and less obtrusive.
- Weights: To get your bait to the right depth, you'll need weights. Common options include:
- Egg Sinkers/Bullet Weights: These can be threaded directly onto the mainline above a swivel and bead, or used in-line above your leader.
- Clip-On Weights: Removable weights that can be added or removed without re-tying, useful for adjusting depth on the fly.
- Bottom Bouncers: For fishing close to the bottom, these keep your bait off the structure.
- Lead Core Line or Downriggers: For serious depth control, lead core line or downriggers are superior, especially for species like togue that often hold deep. Our article on Trolling Techniques for Maine Lakes, dives deeper into these methods.
It's always a good idea to have a variety of weights on hand, easily purchased from any local tackle shop or through online retailers.
Step-by-Step Live Bait Rigging Techniques
Now, let's get down to the actual rigging. The goal is to keep the bait alive, swimming naturally, and positioned for a solid hookset.
The Nose-Hook Rig
This is perhaps the simplest and most common live bait rig, perfect for smelt, shiners, or small suckers when you want maximum natural swimming action.
- Select Your Hook: Choose a sharp, single hook (size 6 to 1/0) appropriate for your bait size. The hook should be strong enough to handle your target fish but light enough not to inhibit the bait’s movement.
- Attach Leader: Tie your fluorocarbon leader (2-4 feet) to your mainline via a quality barrel swivel. Then, tie your chosen hook to the end of the leader.
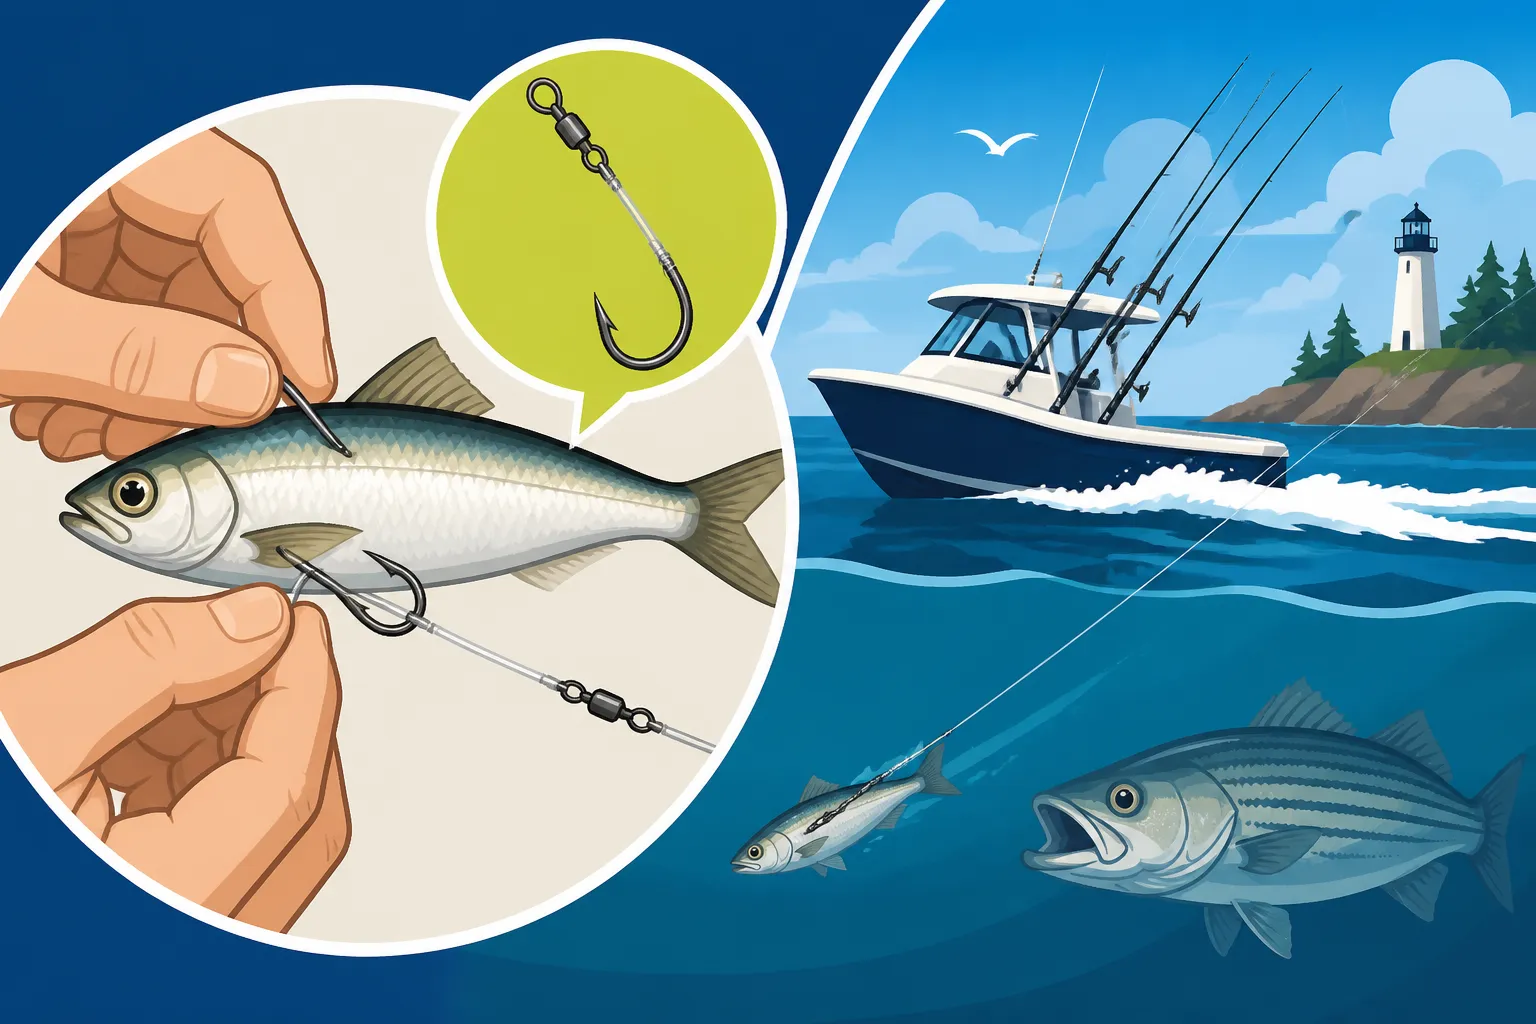
- Hook the Bait: Gently insert the hook through the very tip of the baitfish’s upper jaw, ensuring the hook point is exposed and facing forward. Be careful not to damage the brain or eyes, as this will quickly kill the bait or reduce its vitality. The hook should pass cleanly through the bony part of the nose, allowing the bait to breathe and swim freely.
- Deployment: This rig works well for slower trolling speeds and when fish are actively feeding on the surface or in the upper water column. The bait will swim in a natural, darting motion, mimicking a foraging or slightly distressed fish. It’s excellent for targeting cruising landlocked salmon in early spring or fall.
- When to Use: Ideal for natural presentation, active baitfish, and when fish are not too deep. Best for salmon, trout, and bass.
- Pros: Minimal harm to bait, maximizes natural action, easy to rig.
- Cons: Can sometimes pull out if bait is very active and fights the hook.
The Dorsal Fin Rig
This rig is excellent when you want your bait to swim horizontally or slightly upward, which can be very effective when fish are looking up for prey or when you want to present your bait just above structure or thermoclines.
- Select Your Hook: A sharp, strong single hook (size 4 to 1/0) is usually best.
- Attach Leader: As with the nose-hook rig, connect your fluorocarbon leader to your mainline with a swivel and then tie on your hook.
- Hook the Bait: Carefully insert the hook just beneath the dorsal fin, making sure to go through the tough, fleshy part of the back without hitting the spine. The hook should come out on the opposite side, leaving the hook point exposed and upward. The bait should still be able to swim naturally.
- Deployment: This rig is great for targeting fish that are suspending at a certain depth or relating to subtle changes in topography. The bait will swim in a more horizontal, level fashion, which can be very enticing. It's particularly effective for deeper-holding togue or when you're trying to fish just above a weed bed for bass.
- When to Use: Great for suspended fish, fishing just above structure, and targeting fish that feed upwards. Works for salmon, togue, and bass.
- Pros: Natural horizontal presentation, keeps bait lively.
- Cons: Can potentially harm the bait if not hooked carefully, reducing its lifespan.
The Quick-Strike Rig (Modified for Trolling)
While often associated with ice fishing or dead bait, a modified quick-strike rig can be incredibly effective for larger live bait when trolling for more aggressive predators or larger salmon and togue. The idea is to have multiple hook points to ensure a solid hookset, especially with larger bait.
- Components: You’ll need two single hooks (or one single and one treble) on short, separate leaders, connected to a main leader. Alternatively, some commercially available quick-strike rigs (check your local tackle shop or Amazon) come pre-tied.
- Assembly: Tie a primary single hook (e.g., a 1/0 or 2/0) to the end of your main fluorocarbon leader. Then, on a separate, shorter piece of leader (e.g., 6 inches), tie a second, smaller single hook (size 4 or 2) or a small treble hook (size 8 or 6). Connect this shorter leader to your main leader using a small swivel or by tying it in with a dropper loop, ensuring the second hook can move freely.
- Hook the Bait: Nose-hook the primary hook through the bait's upper jaw, just as you would with the nose-hook rig. Then, gently insert the second hook (the "stinger" hook) into the baitfish’s flank, either near the tail or along the side, depending on the bait’s size. The goal is to have the stinger hook positioned where a striking fish is likely to engulf the bait.
- Deployment: This rig is excellent for larger baitfish and when you want to ensure a solid hookset on hard-to-hook species or short-striking fish. The two points of contact make it harder for the fish to steal the bait. This can be especially good when targeting trophy Lake Trout and Togue Fishing in Maine or when you're confident bigger salmon are around.
- When to Use: For larger baitfish, targeting bigger fish, and ensuring better hookups on aggressive strikes.
- Pros: High hook-up ratio, especially with larger fish.
- Cons: More complex to rig, potentially more damaging to bait, can make catch-and-release harder.
Trolling Strategies with Live Bait
Rigging your bait correctly is just one piece of the puzzle. How you troll it can make all the difference between a productive day and a frustrating one.
Depth Control: Getting to Where the Fish Are
Maine's lakes can be incredibly deep, and fish often hold at specific depths, especially in summer. Mastering depth control is paramount for successful live bait trolling.
- Downriggers: These are perhaps the most precise tools for depth control. A downrigger uses a heavy weight (called a cannonball) and a cable to carry your fishing line down to a precise depth. Your line is attached to the cannonball's cable with a release clip, which trips when a fish strikes, freeing your line to fight the fish directly. Downriggers allow your bait to swim freely and naturally without heavy weights directly on your fishing line, mimicking a baitfish that's separated from the school. This technique is often critical for How to Fish Deep Water for Summer Trout when they retreat to colder, oxygenated depths.
- Lead Core Line: This specialized line changes color every 10 yards (or 30 feet), allowing you to estimate how much line you have out and, therefore, how deep your bait is running. Generally, each color takes your bait down about 5 feet at a typical trolling speed. It's less precise than a downrigger but much simpler and very effective for targeting a wide range of depths, particularly for landlocked salmon.
- Snap Weights & Trolling Sinkers: These are simpler methods for getting your bait down. Snap weights clip onto your line at a desired distance from your bait, adding weight. Trolling sinkers are simply heavier weights tied in-line above your leader. They are effective for moderate depths but can impact the natural action of your live bait more than downriggers or lead core.
- Planer Boards: While not directly for depth, planer boards help spread your lines out horizontally, covering a wider swath of water and preventing tangles, especially when running multiple lines. This is particularly useful in shallower waters or when fish are scattered.
Speed and Presentation: Making Your Bait Irresistible
The speed at which you troll and the way your bait moves through the water are critical. Live bait is already at an advantage because it is alive, but you can enhance its appeal.
- Trolling Speed: Generally, slower speeds are better for live bait to maintain its natural action. Think about the speed of a naturally swimming baitfish or one that's slightly injured. For salmon and togue, this might be anywhere from 1.0 to 2.5 miles per hour, but it varies daily. Experimentation is key. Watch your rod tip and the action of your bait (if you can see it in clear water) to find that sweet spot where it looks natural and enticing. Too fast, and your bait might spin unnaturally or die quickly; too slow, and it might not cover enough water or attract attention. The article on Best Trolling Speed for Landlocked Salmon, provides more specific guidelines.
- Mimicking Injured Prey: Sometimes, a slightly erratic retrieve or a bait that appears injured can trigger strikes. This is where the natural action of live bait really shines. As your boat moves and subtly changes direction, your live bait will respond with natural darting and struggling motions, perfectly imitating an easy meal.
- Covering Water: Trolling allows you to cover vast amounts of water, searching for active fish. Use your GPS to track successful paths and replicate them. Don't be afraid to make wide turns; these often change the speed and depth of your lures on the inside and outside of the turn, sometimes triggering a bite.
Reading the Water and Your Fish Finder
Understanding the underwater landscape is just as important as knowing how to rig your bait. Your fish finder is your best friend in this regard.
- Locating Structure: Fish often relate to structure such as drop-offs, underwater humps, rock piles, and submerged timber. Use your fish finder's sonar to identify these features. Trolling your live bait along the edges of a drop-off or over the top of a submerged hump can be incredibly productive, as these are natural ambush points for predators. Our guide on Reading Lake Structure for Bass and Trout, offers more detailed strategies for interpretation.
- Finding Baitfish Schools: The presence of baitfish is a strong indicator that predatory fish are nearby. Your fish finder will often show dense clouds of baitfish. Troll your live bait through or around these schools; salmon and togue are often lurking nearby, ready to pick off stragglers.
- Targeting Fish Arches: When your fish finder marks individual fish arches, pay attention to their depth and location. Adjust your trolling depth to present your live bait directly to those fish. It’s a game of precision, and a good fish finder, coupled with precise rigging and depth control, dramatically increases your chances. Understanding Reading a Fish Finder on Maine Lakes is a fundamental skill that will help you put more fish in the boat.
| Rigging Method | Best For | Pros | Cons | Key Feature |
|---|---|---|---|---|
| Nose-Hook Rig | Active smelt, shiners, cruising salmon/trout | Maximizes natural swimming action, minimal bait harm, simple | Can pull out on aggressive strikes, bait might come off | Maximum natural movement |
| Dorsal Fin Rig | Suspended fish, fishing over structure | Natural horizontal presentation, keeps bait lively, good hookset | Can harm bait if not careful, reduces bait lifespan | Level swimming presentation |
| Quick-Strike Rig | Larger bait, aggressive fish, better hook-ups | High hook-up ratio, especially for big fish, multiple hook points | More complex to rig, potentially more bait damage, harder C&R | Multiple hook points for secure hook-up |
Rigging live bait for trolling in Maine is a skill that develops with practice and observation. There's no single "best" method that works every time; success lies in adapting to the conditions, understanding your target species, and constantly experimenting. The joy of fishing with live bait comes from its innate ability to entice strikes when artificial lures fall short. So next time you're out on a beautiful Maine lake, don't shy away from the art of live bait trolling. With these techniques in your arsenal, you'll be well on your way to more memorable catches.
Disclaimer
This article is for general informational purposes only and does not constitute professional advice. Laws, prices and regulations vary by location and change over time. Consult a qualified professional for guidance on your specific situation.