How to Tie a Palomar Knot
There’s nothing quite as frustrating as feeling that satisfying tug on your line, only for the fish to break free because your knot failed. It’s a common heartache for many anglers, whether you’re casting for brook trout in a remote stream or trolling for landlocked salmon on a vast lake. A weak knot can turn an exciting moment into a disappointing "what if." This guide is here to ensure that doesn't happen, walking you through how to tie one of the strongest and most reliable knots in fishing: the Palomar knot.
Why the Palomar Knot is a Go-To for Maine Anglers
When you're out on the waters of Maine, whether it's the chilly depths of Moosehead Lake or the vibrant estuaries of the Kennebec River, you need equipment you can trust. The Palomar knot has earned its reputation as a fan-favorite among experienced anglers for several excellent reasons, making it a staple for everything from lightweight fly fishing to heavier spinning tackle. It's renowned for its incredible strength, often retaining close to 100% of the fishing line's breaking strength, which is pretty impressive when you think about it.
This knot’s reliability comes from its simple, symmetrical design, which distributes stress evenly across the line, minimizing weak points that can fray or slip under pressure. It's a fantastic knot for securing hooks, swivels, and lures to your fishing line, and its compact nature means it won't interfere with the action of your presentation in the water. Plus, once you've learned it, it's surprisingly quick and easy to tie, even with cold fingers or in low light conditions – a huge advantage when you're trying to get back to the action quickly during prime biting hours.
Its versatility is another huge plus. From tying on a small jig for perch in an inland pond to attaching a streamer for a feisty salmon, the Palomar knot handles a wide range of line types and weights with grace. While some knots can be finicky with fluorocarbon or braided lines, the Palomar generally performs beautifully across the board, giving you one less thing to worry about when you're focusing on the catch. This is precisely why it's a knot you'll find seasoned Maine guides teaching to their clients.
Step-by-Step Guide to Tying the Palomar Knot
Tying a Palomar knot is straightforward once you get the hang of it, almost like muscle memory. Follow these steps carefully, and you'll soon be tying it confidently every time. Remember, practice makes perfect, so grab some spare line and a hook and try it out a few times before you hit the water.
Preparing Your Line and Lure/Hook
The foundation of any good knot starts with proper preparation. This isn't just about speed; it's about ensuring the knot has the best chance to hold its strength. Before you even start making loops, consider the conditions. Are your hands cold? Is the light fading? These factors can influence how easily you manipulate the line.
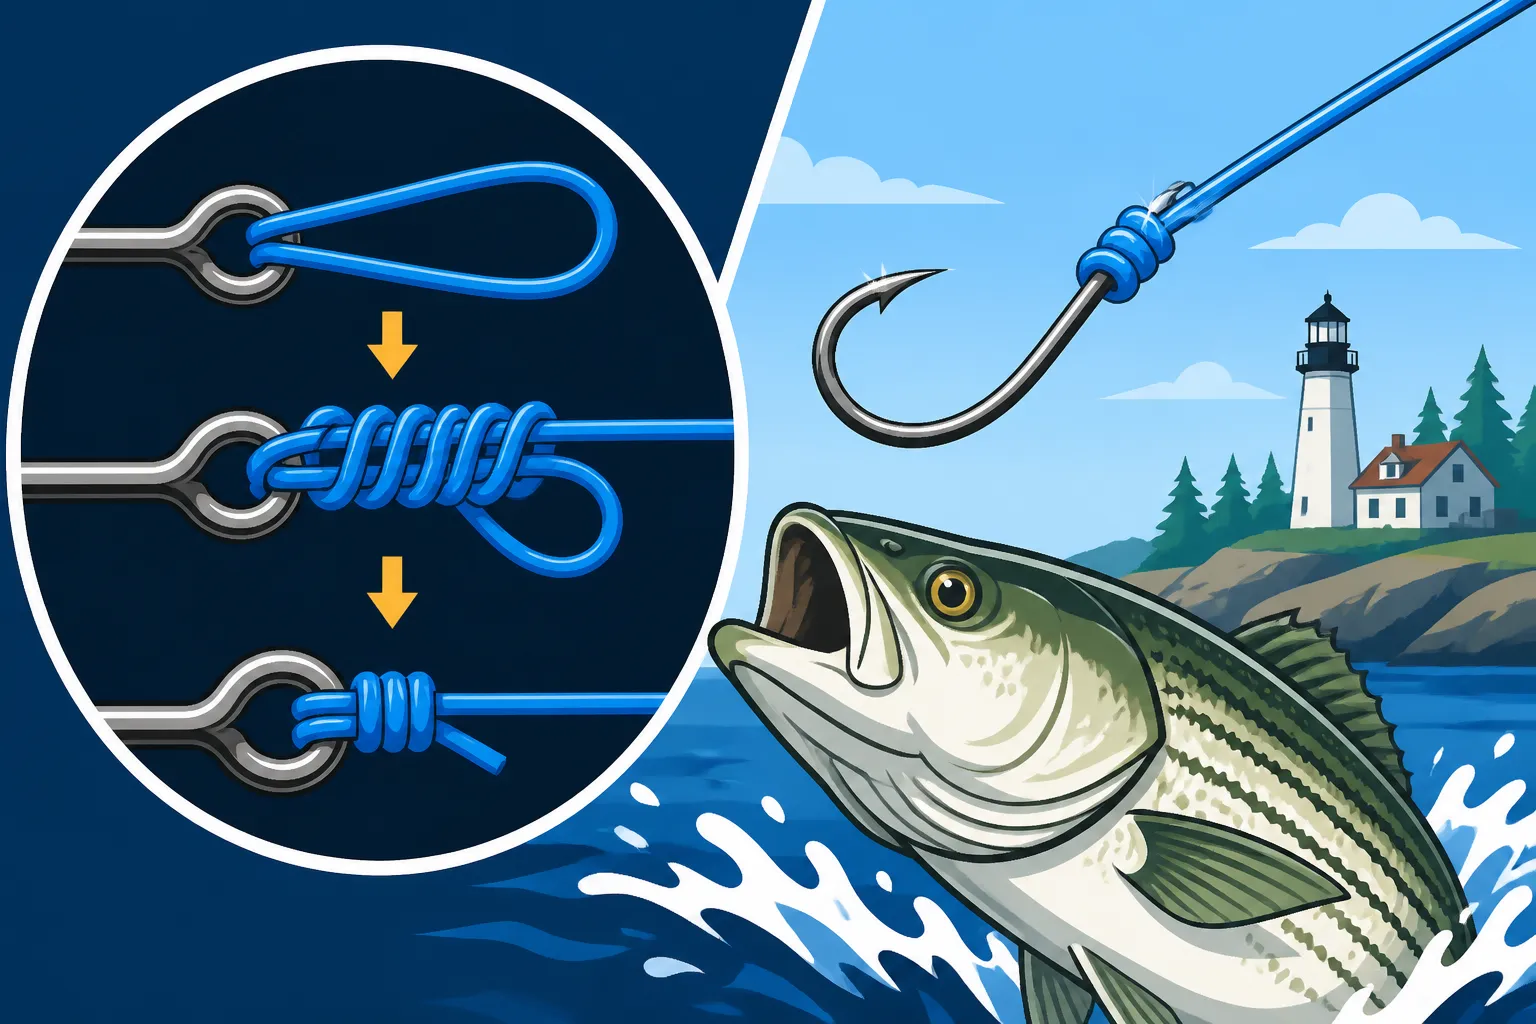
First, you'll need to double about six to eight inches of your fishing line. This means taking the end of your line and folding it back on itself, creating a loop. Now, pass this doubled line through the eye of your hook, lure, or swivel. It might feel a little bulky, but this is a critical step for the knot's structure. If the eye of your lure is particularly small, you might find it easier to thread just the single line through and then bring it back through again, effectively doubling it after it's passed through the eye. Many anglers find high-quality lines, sometimes found on Amazon, make this process smoother due to their consistent diameter and reduced memory.
Forming the Simple Overhand Knot
Now comes the part where the knot really begins to take shape. With your doubled line passed through the eye, you'll have a loop on one side and two tag ends (your main line and your doubled-back tag end) on the other. Take the doubled line that you just passed through the eye and tie a simple overhand knot around the main line. It’s exactly like tying the first step of a shoelace knot, but you're doing it with your doubled line around your main line.
Make sure this overhand knot is quite loose at first. You don't want to pull it tight yet. The key here is to keep the eye of your hook or lure inside the loop formed by this overhand knot. Imagine the doubled line forming a circle, and your main line (connected to your rod) passing through the middle of that circle. The hook's eye should be nestled within this loose overhand loop, not outside it. This is where many beginners might go wrong, so take your time and visualize it.
Completing the Loop and Tightening
This is the final crucial step to sealing the deal on a strong Palomar knot. Once you have your loose overhand knot with the lure's eye inside, take the large loop of doubled line you initially created. This is the loop that's now part of your loose overhand knot. You need to pass your hook, lure, or swivel entirely through this large loop. Yes, the whole thing!
Once the lure or hook has passed through this big loop, pull both ends of the main line slowly and evenly to start drawing the knot tight. As you pull, ensure the loop cinches down neatly around the eye of the hook or lure. This is the moment when you absolutely must moisten the knot with saliva or water. Lubricating the line reduces friction as the knot tightens, preventing heat buildup that can weaken the line. Finally, pull both the main line and the tag end firmly to seat the knot securely against the eye. Trim any excess tag end, leaving about 1/8 to 1/4 inch, and you're good to go! For those dark mornings out on a Maine lake, a good headlamp, also available on Amazon, can make these final steps much easier.
Common Mistakes to Avoid When Tying a Palomar Knot
Even with a seemingly simple knot like the Palomar, small missteps can compromise its integrity. Being aware of these common errors can help you prevent knot failure and avoid the heartbreak of losing a trophy fish.
Not Moistening the Line
This is perhaps the most frequent oversight, and it's a critical one. When you pull a knot tight, especially with monofilament or fluorocarbon lines, friction generates heat. This heat can actually weaken the line at the point of the knot, reducing its breaking strength significantly. It's like cooking your line!
Always, and I mean always, moisten your knot with saliva or water before you cinch it down. This lubrication allows the line to slide smoothly into place, preventing friction and heat damage. Think of it as giving your knot a little drink before it has to do some heavy lifting. You wouldn't send a marathon runner out without water, would you? The same principle applies to your fishing line. Proper lubrication ensures the knot maintains its maximum strength, giving you the best possible connection to whatever bites.
Improper Loop Formation
The initial doubling of the line and the subsequent creation of the overhand knot are foundational to the Palomar. If these loops aren't formed correctly, the knot won't seat properly and will be significantly weaker. Forgetting to double the line, for instance, means you can't even start the Palomar, as it requires that initial loop to pass through the eye.
Another common issue is forming the initial overhand knot too tightly or haphazardly, without ensuring the lure's eye is contained within it. If the overhand knot isn't loose enough, or if the lure gets caught outside the loop as you tighten, the knot becomes a messy tangle of lines rather than a strong, organized structure. This leads to uneven tension distribution and a prime spot for failure. Take your time with the initial setup, ensuring all elements are in their proper place before you start to cinch.
Forgetting to Pass the Lure Through the Large Loop
After you've created your loose overhand knot, the next big step is to pass the entire lure or hook through the large loop that's still dangling. Some anglers, in their haste, will skip this part or try to pull the knot tight without completing this crucial step. The result? A knot that simply won't form correctly.
If you don't pass the lure through, you'll end up with a slip knot or a half-formed mess that will unravel under the slightest tension. This step ensures that the final wraps of the Palomar knot properly encircle the eye of the hook, creating that signature strong connection. Always double-check that your lure has gone through that final large loop before you start to tighten. It's the difference between a reliable connection and a guaranteed break-off, especially if you're battling a hard-fighting fish like a Maine landlocked salmon or a feisty smallmouth bass.
When to Use (and When Not to Use) Your Palomar Knot in Maine
The Palomar knot is a fantastic all-around performer, but like any tool, it has its sweet spots and situations where other knots might be a better choice. Knowing when and where to deploy it can make a real difference in your Maine fishing adventures.
Ideal Scenarios
The Palomar shines brightest in situations where you need a strong, reliable connection directly to the eye of a hook, lure, or swivel. This makes it an absolute winner for general open water fishing in Maine. If you're tying on a shiny spoon for lake trout on Sebago Lake, a spinner for brook trout in a clear stream, or a plastic worm for bass in the Belgrade Lakes, the Palomar is your friend. Its high breaking strength retention means you can cast with confidence, knowing your expensive lure isn't likely to sail off into the abyss on a powerful cast or get snapped off by a hard-hitting fish.
It's particularly effective with braided lines, which can be slippery for some other knots. The Palomar's unique structure helps it grip braided line exceptionally well, making it a favorite for anglers using these lines for added sensitivity and strength. You can even use it for tying on the small swivels you might use for managing line twist when trolling for salmon or togue. Whether you’re fishing for brook trout, landlocked salmon, togue, or bass, the Palomar is a superb choice for most lure-to-line connections. It’s also excellent for attaching a leader to a main line via a swivel, providing a robust junction. If you're stocking up on terminal tackle for the season, remember you can find a huge variety of hooks, swivels, and lures on Amazon that are perfect for this knot.
Situations to Consider Alternatives
While incredibly versatile, there are a couple of situations where the Palomar might not be your absolute best option. One primary consideration is when you're dealing with very small hook eyes. Because the Palomar requires you to double your line and pass it through the eye twice, and then pass the entire hook or lure through a loop, it can be quite cumbersome, if not impossible, with extremely tiny eyelets. This might be the case with some very small flies or ultra-light jigs where the line simply won't fit through the eye twice without significant effort, potentially damaging the line in the process.
In such cases, alternative knots like the Improved Clinch knot or a Uni knot might be more appropriate, as they typically only require a single pass through the eye. For specific fly fishing applications, where presentation is key and you're working with delicate leaders and tippets, specialized fly knots like the Davy knot or the Orvis knot might be preferred for their lower profile and ease of tying on tiny hooks. Additionally, if you're trying to tie two lines together (like a braided main line to a fluorocarbon leader), the Palomar is not the knot for that job. For line-to-line connections, you'd look to knots like the FG knot, Alberto knot, or Uni-to-Uni splice. Knowing the different types of fishing knots every Maine angler should know can definitely expand your angling toolkit.
Here's a quick comparison of the Palomar knot's strengths and weaknesses:
| Feature | Palomar Knot Strengths | Palomar Knot Weaknesses |
|---|---|---|
| Strength | Retains nearly 100% of line strength, very reliable | Can be weakened if not moistened before tightening |
| Ease of Tying | Relatively simple and quick to learn, easy to tie in a pinch | Can be challenging with very small hook/lure eyes |
| Versatility | Excellent for hooks, lures, swivels; good with mono, fluoro, braid | Not suitable for line-to-line connections or leader attachment to main line (without a swivel) |
| Profile | Compact and streamlined, doesn't impede lure action | Requires doubling the line, which can be bulky for tiny eyes |
By mastering the Palomar knot, you’re adding a powerful, reliable tool to your Maine fishing arsenal. It’s a fundamental knot that will serve you well across countless fishing scenarios. So grab some line, practice these steps, and get ready to tie a stronger connection to those Maine fish! You can learn about more specific regulations in the Maine Fishing Regulations Explained guide, or check out Maine Open Water Line Limits to know how many lines you can use with your newly tied lures. If you're planning a full trip, consider reviewing the Maine Fishing Season Dates Guide, and remember that knowing the Best Time of Year to Fish in Maine can significantly impact your success. Don't forget to check out articles like Best Rods for Maine Lake Trolling and Best Lures for Maine Open Water Fishing for more ways to enhance your fishing experience. Knowing Catch and Release Best Practices in Maine is also vital for preserving our precious fish populations.
Disclaimer
This article is for general informational purposes only and does not constitute professional advice. Laws, prices and regulations vary by location and change over time. Consult a qualified professional for guidance on your specific situation.